Home > Electronics > Sensor Gadget
Arduino Sensor Gadget
Arduino is an open-source electronics platform based on low cost and easy-to-use hardware and software. It's intended for anyone making interactive projects.
The Sensor Gadget consists of a variety of tiny sensors, similar to those found in a typical smart phone, connected to an Arduino Nano processor. A small graphic screen from an old Nokia phone displays the outputs.
The sensors include temperature, humidity, atmospheric pressure, magnetic field strength, gravity and accelerometer, and an optional light meter.
The circuit is reasonably simple, with only a few additional components. The Arduino Nano and the various sensors are small pre-assembled boards that fit onto the main circuit board.
Input is through a rotary selector which can be turned to choose items and clicked to select.
Components
These are photos showing the Sensor Gadget circuit board being assembled and in operation. Here are the Assembly Instructions.
The parts are:
| Item | Function / Description |
|---|---|
| BM280 | Temp / Humidity / Air Pressure |
| MPU 9250 / 6500 | MPU6500 Accelerometer and Gyro plus AK8963 Magnetometer |
| LCD | Nokia 5110 display |
| ATMega328 | Micro controller / Arduino Nano |
| Switch | Rotary Selector |
Arduino Nano
This circuit uses the same Arduino Nano module that we used in 2015 and 2017. Find out more by looking at the Arduino Nano information page.
Programming
The simple nature of the circuit means that most of the complexity is in the software.
The programme for the sensor gadget is quite simple due to the library modules used for each sensor. In general it is a case of initialising the sensor, reading the values and then displaying them in a useful way. The libraries do all the hard work but add to the size so the programme fills up over 90% of the storage in the Arduino chip.
The software components are:
| Item | Description |
|---|---|
| Screen | The screen is from a Nokia 5110 - if you can remember those old phones. It can show text and graphics. |
| Selector | The selector can be rotated to highlight a menu item or change a setting. Then press to choose that item or return to the main menu. When viewing a sensor, click the selector to return to the menu. |
| Menu system | Allows a choice of which sensor is displayed. Rotate the selector to highlight an item, then click to select that item. |
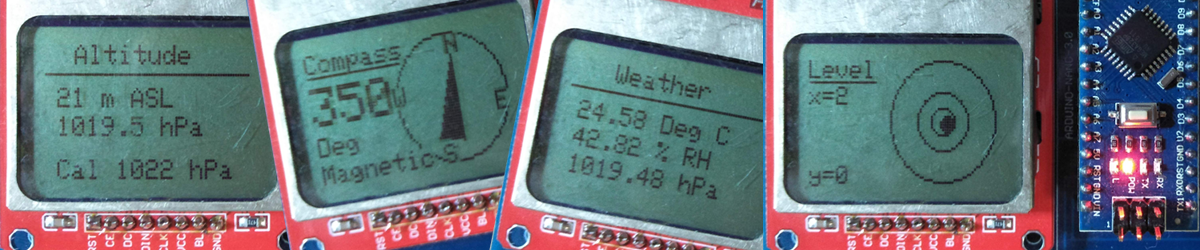
| Weather | Displays the temperature, humidity and barometric pressure. If you set the base level air pressure, eg from today's weather forecast, then the changing pressure can be used to calculate the elevation. |
| Compass | There is a magnetometer sensor which gives the magnetic strength in x, y and z axis. This can be used to calculate north and from this draw a compass. Calibrating the compass is essential to get an accurate direction. |
| Level | The gravity meter can be used to determine an offset in the x, y and z axis. This is used to draw a simple spirit level that is surprisingly accurate. |
Calibration
To calibrate the altimeter, look up the pressure at sea level in today's weather forecast or the Bureau of Meterology web site. Select the Weather module, then use the selector to adjust the atmospheric pressure.
To calibrate the compass, place it on a horizontal surface and rotate until the calibration finishes. This takes about 10 seconds. The process determines the maximum and minimum values and uses this to derive an offset. This process is essential to get an accurate direction.
The calibration settings are stored in the Arduino's non-volatile memory, so you don't need to re-calibrate every time.